Revit 2018 Modify Extruded Roof

Solved Extruding A Roof In Revit To Drop Below The Main Roof Line Autodesk Community Revit Products

Solved Extruding A Roof In Revit To Drop Below The Main Roof Line Autodesk Community Revit Products

Revit Tutorials Roofs Youtube

Revit Tutorials Roofs Youtube

Autodesk Revit Architecture 2008 Training Videos On Dvd Revit Architecture Learn Revit Autodesk Revit

Autodesk Revit Architecture 2008 Training Videos On Dvd Revit Architecture Learn Revit Autodesk Revit

Solved Roof Is Drawn Higher Than Level Placed At Autodesk Community Revit Products

Solved Roof Is Drawn Higher Than Level Placed At Autodesk Community Revit Products

Revit Roof By Extrusion A How To Guide Youtube

Revit Roof By Extrusion A How To Guide Youtube

Revit Roof Basics 04 Intersect By Roof Join Cadclips Youtube

Revit Roof Basics 04 Intersect By Roof Join Cadclips Youtube

Revit Roof Basics 04 Intersect By Roof Join Cadclips Youtube

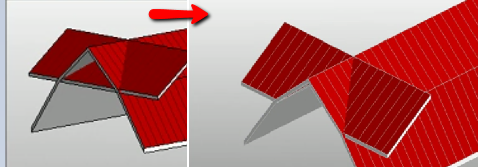
Modify a roof after creating a roof you can change its shape or overhang cut openings or align ridges.

Revit 2018 modify extruded roof.

Then follow these 2 steps. If selected it means the roof is part of a room boundary. If not selected it means the roof is not part of a room boundary. Use join unjoin roof tool.

Roof slope you can define the slope of a roof using various methods. The wall must be attached to the target roof and the target roof must be a footprint roof. Eaves when creating a roof specify an overhang value to create eaves. In the roof reference level and offset dialog select a value for level.

Select the extruded roof and click modify roofs tab opening panel vertical. Revit completes the extrusion and returns you to the view in which you started the extrusion. To assign a solid extrusion to a subcategory under identity data for subcategory select a subcategory. Create a roof by extrusion creates a roof by extruding a profile that you sketch.

Cut openings in an extruded roof select the extruded roof and click modify roofs tab opening panel vertical. To create a dormer model required walls and additional roof. Reference planes define the boundary of the roof. Sets the level for the footprint or extruded roof.

Cut openings in an extruded roof. This property is read only before creating a roof. You cannot join a roof to more than one top face of another roof. A plan view representation of the roof displays.

This tool is located in the modify tab. Join roofs you can join roofs to other roofs or walls or unjoin them if they were previously joined. The highest level in the project is selected by default. Closed loop sketches in sketch mode click.

This is a general. The work plane with which an extruded roof is associated. To raise or lower the roof from the reference level specify a value for offset. 9 join roofs add opening to create dormer.

To view the extrusion open a 3d view. Use it to extend the dormer roof to the main roof. You can join a roof to the top face of another roof and the wall below that roof if you select the wall as the target. Revit places a reference plane at the specified offset.

You can join roofs to other roofs or walls or unjoin them if they were previously joined. Using the reference plane you can control the position of the extruded roof in relation to a level.

Watched Advanced Revit Architecture 2014 Tutorial Applying Walls To The Mass Youtube Revit Tutorial

Watched Advanced Revit Architecture 2014 Tutorial Applying Walls To The Mass Youtube Revit Tutorial

How To Cut A Hole To A Roof Revit Lt 2018 Autodesk Knowledge Network

How To Cut A Hole To A Roof Revit Lt 2018 Autodesk Knowledge Network

Simply Complex Rotation Rigs That Do Not Use The Angluar Dimension Revit Family Rotating Autocad

Simply Complex Rotation Rigs That Do Not Use The Angluar Dimension Revit Family Rotating Autocad

Solved Roof Won T Join Autodesk Community Revit Products

Solved Roof Won T Join Autodesk Community Revit Products

Source : pinterest.com